
You know the challenge to provide current and well written editor documentation, don’t you? Probably you are tired in writing MS Word documents, converting them to pdf, sending them around via e-mail and knowing, at the same time, that nobody will read it. In this post I will show you a solution with which the editors will have it right at their fingertips, when working in the TYPO3 backend.
The solution is simply described in one sentence: It’s a backend module which resides in the section „Help“ and loads a part of the page tree within an iframe in the backend, styling of the website included. This approach has the advantage that the documentation
- has a nice layout
- is easy to read
- is accessible where the editor works
- can be updated at any time without any distribution efforts
- can use all the power the TYPO3 installation has (incl. extensions)
It will be also a good location for spreading editor and TYPO3 related news, especially if it is used as the module, which is instantly loaded after the backend login.
If you are in doubt whether this tutorial is something for you, because you are an integrator with basic php knowledge. Trust me, using this tutorial you do not need much (any?) php knowledge.
So … these few following steps are necessary. You do not have to type all steps manually. At the end of the post is a zip file which contains all necessary files and folders.
1) Create a basic extension folder tree
Usually you will do it using the EXT:extension_builder, but in this case the creation of some folders and files is sufficient. The extension_builder would be overkill.
You do this by creating the following folder tree beneath „/typo3conf/ext”
- customerdocs
   - Classes
      - Controller
   - Configuration
      - TypoScript
   - Resources
      - Private
         - Language
         - Templates
      - Public
If you are already using a template layout extension, this structure will be already there. You can use this, but you have to replace several strings later. In most cases it will be the extension key.
2) Create extension manager configuration file
The first file is „ext_emconf.php“ in the root folder of the extension. You must replace all strings in “<>” with your custom values
<?php

########################################################################
# Extension Manager/Repository config file for ext: „customer_docs"
########################################################################

$EM_CONF[$_EXTKEY] = array(
    'title' => 'Customer Documentation',
    'description' => 'Provides the help pages for your customers',
    'category' => 'module',
    'author' => '<your name>',
    'author_email' => '<your email here>',
    'author_company' => '<your_company here>',
    'shy' => '',
    'priority' => '',
    'module' => '',
    'state' => 'stable',
    'internal' => '',
    'uploadfolder' => '0',
    'createDirs' => '',
    'modify_tables' => '',
    'clearCacheOnLoad' => 0,
    'lockType' => '',
    'version' => '1.0.0',
    'constraints' => array(
        'depends' => array(
            'extbase' => '7.6',
            'fluid' => '7.6',
            'typo3' => '7.6',
        ),
        'conflicts' => array(
        ),
        'suggests' => array(
        ),
    ),
);
The second file, you must add, is a gif file named „ext_icon.gif“, which resides on the same level and is the icon which will be displayed in the extension manager and in the module menu.
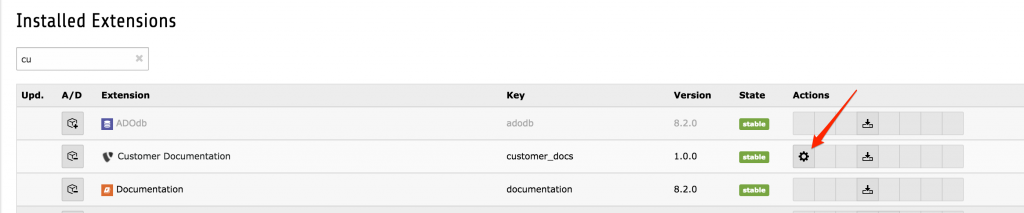
At this point you can already go to the extension manager (EM) and activate the extension.
3) Add the extension configuration file
Create an empty file „ext_conf_template.txt“ at the root level of the extension and add the following lines:
# cat=basic//010; type=int+; label= PID of Documentation
documentationPid =
This enables another icon in the EM, where you can set the pid where the documentation will reside. If you have this extension in the version control system and you want to deploy it, you can set the pid already in the code. But you can overwrite it in the TYPO3 backend via the EM later at any time.
4) Create the controller for the module
To achieve this you need to create a the file „HelpController.php“ in the folder „customer_docs/Classes/Controller“. You must replace “MyNameSpace” with the name of your namespace. A good possibility is using a combination of your first- and lastname. In my case it would be “MarcusSchwemer”.
<?php

namespace MyNameSpace\Customerdocs\Controller;

use TYPO3\CMS\Extbase\Mvc\Controller\ActionController;

/***************************************************************
* Copyright notice
*
* (c) <your name here>
*
* All rights reserved
*
* This script is part of the TYPO3 project. The TYPO3 project is
* free software; you can redistribute it and/or modify
* it under the terms of the GNU General Public License as published by
* the Free Software Foundation; either version 3 of the License, or
* (at your option) any later version.
*
* The GNU General Public License can be found at
* http://www.gnu.org/copyleft/gpl.html.
*
* This script is distributed in the hope that it will be useful,
* but WITHOUT ANY WARRANTY; without even the implied warranty of
* MERCHANTABILITY or FITNESS FOR A PARTICULAR PURPOSE. See the
* GNU General Public License for more details.
*
* This copyright notice MUST APPEAR in all copies of the script!
***************************************************************/

class HelpController extends ActionController
{

    public function indexAction()
    {
        $config = unserialize($GLOBALS['TYPO3_CONF_VARS']['EXT']['extConf']['customerdocs']);
        $this->view->assign('config', $config);
    }
}
The controller takes the configuration as an argument an passes it on to the template, which will be created in the next step.
5) Create the template for the backend module
The template for the backend module is a simple „Index.html“ file which resides in „/Resources/Private/Templates/Help/„. The content of the file are the following three lines:
<iframe src="../index.php?id={config.documentationPid}" width="100%" height="98%" name=„customerdocsview">
    <p>Sorry, your browser is not able to show embedded frames</p>
</iframe>
6) Create TypoScript Files for the module
As with frontend extensions you need to add two TypoScript files for the module: “constants.txt” and “setup.txt”
constants.txt
module.tx_customerdocs {
    view {
        # cat=module.customerdocs/file; type=string; label=Path to template root (BE)
        templateRootPath = EXT:customerdocs/Resources/Private/Backend/Templates/
        # cat=module.customerdocs/file; type=string; label=Path to template partials (BE)
        partialRootPath = EXT:customerdocs/Resources/Private/Backend/Partials/
        # cat=module.tx_customerdocs/file; type=string; label=Path to template layouts (BE)
        layoutRootPath = EXT:customerdocs/Resources/Private/Backend/Layouts/
    }
    persistence {
        # cat=module.customerdocs//a; type=string; label=Default storage PID
        storagePid =
    }
}
setup.txt
# Module configuration
module.tx_customerdocs {
    persistence {
        storagePid = {$module.tx_customerdocs.persistence.storagePid}
    }
    view {
        templateRootPath = {$module.tx_customerdocs.view.templateRootPath}
        partialRootPath = {$module.tx_customerdocs.view.partialRootPath}
        layoutRootPath = {$module.tx_customerdocs.view.layoutRootPath}
    }
}
Further settings or adjustments in these files are not necessary.
7) Add language files
For a proper display of the module labels language files in xlf format are required. Create a file “typo3conf/ext/customerdocs/Resources/Private/Language/locallang_customerdocs.xlf“ and add the following content.
<?xml version="1.0" encoding="utf-8" standalone="yes" ?>
<xliff version="1.0">
<file source-language="en" datatype="plaintext" original="messages" date="2012-07-09T16:24:09Z" product-name="customerdocs">
    <header/>
    <body>
        <trans-unit id="mlang_tabs_tab">
            <source>Customer Docs</source>
        </trans-unit>
        <trans-unit id="mlang_labels_tabdescr">
             <source>Opens the customer documentation for editors</source>
        </trans-unit>
        <trans-unit id="mlang_labels_tablabel">
             <source>Customer Docs</source>
        </trans-unit>
    </body>
</file>
</xliff>
If you want to add another language, just create another file in the same directory with a prefix for the language followed by a dot. For example „de.locallang_customerdocs.xlf“ for german.
<?xml version="1.0" encoding="utf-8" standalone="yes" ?>
<xliff version="1.0">
<file source-language="en" target-language="de" datatype="plaintext" original="messages" date="2012-07-09T16:24:09Z" product-name="customerdocs">
    <header/>
    <body>
        <trans-unit id="mlang_tabs_tab">
            <source>Customer Docs</source>
            <target>Kunden-Dokumentation</target>
        </trans-unit>
        <trans-unit id="mlang_labels_tabdescr">
            <source>Opens the customer documentation for editors</source>
            <target>Öffnet die Kundendokumentation für Redakteure</target>
        </trans-unit>
        <trans-unit id="mlang_labels_tablabel">
            <source>Customer Docs</source>
            <target>Kunden-Dokumentation</target>
        </trans-unit>
    </body>
</file>
</xliff>
8) Register the TYPO3 backend module
Now it is time to register the backend module and make TYPO3 display the module in the help section. This is done in the file „ext_tables.php“, which is also located in the root folder of the extension. Please create the file and add these lines. Please change the string “MyVendorName” to something individual.
<?php
if (!defined('TYPO3_MODE')) {
    die ('Access denied.');
}

if (TYPO3_MODE === 'BE') {

/**
 * Registers a Backend Module
 */
\TYPO3\CMS\Extbase\Utility\ExtensionUtility::registerModule(
    'MyVendorName.'.$_EXTKEY,
    'help', // Make module a submodule of 'help'
    'customerdocs', // Submodule key
    '', // Position
    array(
        'Help' => 'index', // defines which controller should be used by the BE module
    ),
    array(
        'access' => 'user,group',
        'icon' => 'EXT:' . $_EXTKEY . '/ext_icon.gif',
        'labels' => 'LLL:EXT:' . $_EXTKEY . '/Resources/Private/Language/locallang_customerdocs.xlf',
    )
);
}
9) Enable the module for BE users
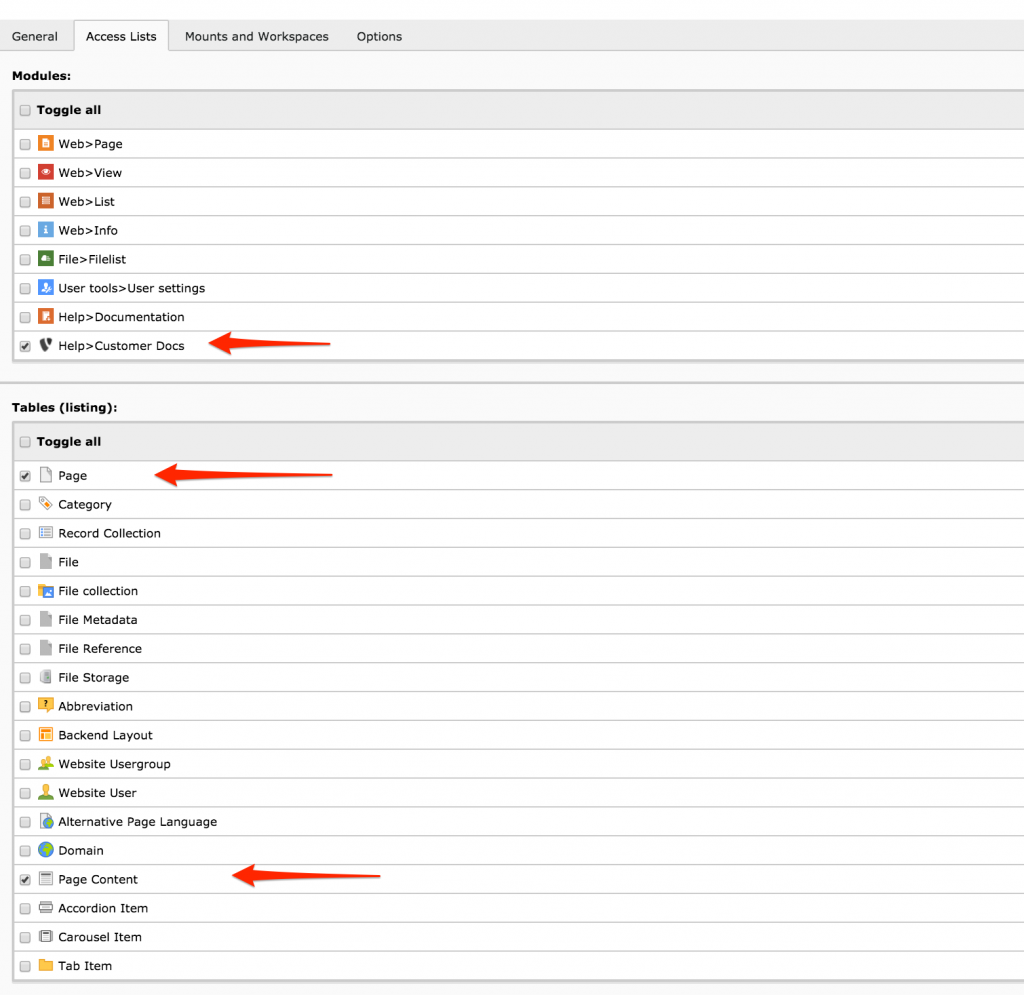
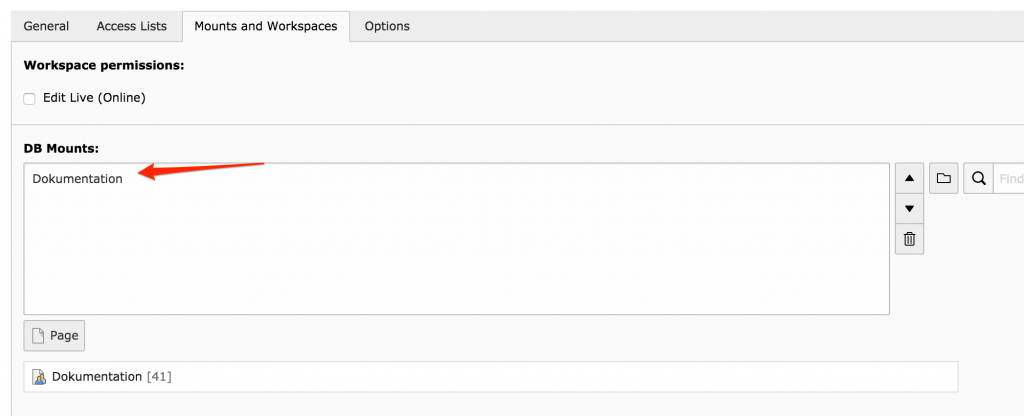
The last technical step to enable the module for the editors and to provide the database mount. This should be done in a separate group, which can be added to any other group or user.
10) Create user documentation
Creating the module was really easy … nine reproducible steps. But now the comes the hard part … Creating the editor documentation. I know, this is not a task everybody likes. But see it like this: Using this kind of editor documentation is also some kind of quality assurance. If you provide a step by step instructions and templates of content elements, which users can copy, paste and modify, you prove yourself (and the customer) that your work works.
Maybe it’s the best if you start with this module and add documentation step by step, when a feature is ready to. So it is not “the big documentation“ task at the end.
I wish you now happy coding and documentation sessions!
Finally here is the download link to the EXT:customerdocs

Sounds I have to test that out definitely. Great tut.
I think user documentation is a must.
5