
Because reading manuals is normally hard and boring, most people do not read manuals. Therefore many websites and products offer to take a tour through the main features and options. With the extension “guide”, this is now also possible for TYPO3 in your own modules.
The extension “guide” provides a possibility to create a guided tour for your TYPO3 backend module. The two prerequisites are that you provide the configuration for the guided tour and the extension “guide” is installed.
Let’s start with the latter one…
Install EXT:guide
Via EM
Since Sept. 21st there is a new 8LTS compatible version available via TER. Thanks to Thomas Deuling for pushing this release out to be available for this post. The extension can be installed as any other extension via EM:
- Open the extension manager
- Update the extension list
- Search for the extensionkey “guide”
- Install and activate the extension
Via composer
The github repository must be added to the repository section of your composer json. This is needed because EXT:guide is not (yet) available via packagist.
composer config repositories.guide git https://github.com/tdeuling/typo3-guide
In a second step you need to add the package to the repo section:
composer require typo3-ter/guide
Provide configuration and settings
The configuration is usually provided via TSconfig. There are three possibilities:
- directly in the Page / User TSconfig field.
- include a tsconfig file in the Page / User TSconfig.
<INCLUDE_TYPOSCRIPT: source="/fileadmin/myTour/GuidedTour.pagets">
- register it via
ext_localconf.php. (It should also be possible to add these lines to yourAdditionalConfiguration.php)
if (TYPO3_MODE === 'BE') {
    // Add page typoscript tours
    \TYPO3\CMS\Core\Utility\ExtensionManagementUtility::addPageTSConfig('<INCLUDE_TYPOSCRIPT: source="FILE:EXT:' . $_EXTKEY . '/Configuration/PageTS/GuidedTour.pagets">' );
}
Register the tour via php
Another option to provide the configuration is register the tour via php. This possibility enables the usage of yaml files.
\Tx\Guide\Utility\GuideUtility::addTour(
    'TemplateModule', // Tour identifier
    'LLL:EXT:guide/Resources/Private/Language/BootstrapTourTemplateModule.xlf:tx_guide_tour.title', // Title of the tour
    'LLL:EXT:guide/Resources/Private/Language/BootstrapTourTemplateModule.xlf:tx_guide_tour.description', // Description of the Tour
    'web_ts', // Module key of the tour
    'module-web_ts', // Icon-identifier
    'EXT:guide/Configuration/Tours/' // Base path for the yaml files
);
Another advantage of this way is, that it is possible to provide a different tour for each major TYPO3 version, keeping the possibility to overwrite the yaml config with Page TSconfig settings like described above.
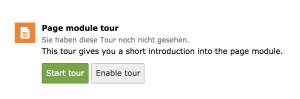
If the tour is correctly registered, it will show up in the tour overview, like in this screenshot:
Configuration of a tour
All configuration is collected in the TSconfig node mod.guide.tours. You define your tour in a sub-node like myModule.
Settings for the module “Guided Tours”
mod.guide.tours.myModule {
    title = My Advanced Module
    description = I will show you how it works
    moduleName = web_myModule
    iconIdentifier = module-mymodule-extensionicon
    steps {
        # In this node, you define the steps of your tour
    }
}
This data is displayed in the tour overview of the “Guided Tours” module.
If you start a tour and you get the error “Not Found — The requested URL /typo3/undefined was not found on this server.”, the module name is not correct or the extension providing the module is not yet installed.
Step definition
The node “steps” is a numeric TSconfig array. Each step is a number and contains several definitions, which fix the layout and the content.
Content
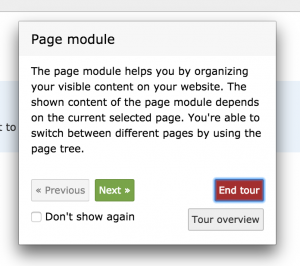
The content is packed into the two options “title” and “content”. These are self explanatory … The title contains a header, which is displayed in bold font and the content explaining the element.
The attributes can also be localized via translations in xlf files.
title = LLL:EXT:guide/Resources/Private/Language/BootstrapTourTopbar.xlf:tx\_guide\_tour.10.title
Placement
You can also define where the popover is placed within the module. The “selector” is a jQuery selector, which serves as the anchor of the content. It must be unique in the DOM of the module. The popover with the content and step navigation will be shown next to it.
With the option “placement” you define, where the popover is shown in relation to the selector. Possible values are “top”, “bottom”, “left”, “right” and “auto”.
If you set the “showArrow” option to true, the popover will show a small arrow in the direction of the selector.
Actions
With the options “show”, “shown” and “hide” you can set what will happen when a step is executed. “Show” is executed when the display process starts. “Shown” is executed when the display of the popover is finished. And finally “hide” is taken into account, when you click the “next” button in the popover.
Possible actions are “addClass”, “removeClass” and “openSelectBox”. All three take again a “selector” as an (required) option. Additionally you can provide a class name, which will be added or removed from the selector.
The next action is helpful, if you want to concatenate another tour after the current one is finished. You need to provide the name of the next tour and the step where is should start. Usually this will be number “0”, but later steps are also possible.
Here an example of a step definition:
10 {
    selector = #groupdelegation-overlay
    title = GroupDelegation Module
    content = Welcome to the Module "Groupdelegation"
    placement = left
    showArrow = true
}
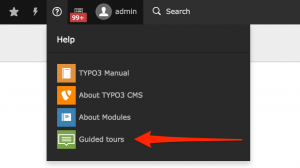
“Live” examples of guided tours
The guide extension comes with several tours for the “standard” TYPO3 backend, like the page or the template module.
Also the backend module of the news extension from Georg Ringer has already got a tour.
Conclusion
This is a great way to introduce backend users to (new) functionality of modules. It is quite easy to configure.
Many modules depend on user generated data. Without such data, it is IMHO not possible to provide a full tour. This data must be provided by the admin or must be imported while installation via ext\_tables+adt.sql file. The default data then must be deleted by an admin in order not to interfere with live data.
If you want to dig more into the topic, you can find the documentation on the website of Thomas Deuling (coding.ms) and in the Readme of the extension. The repository of the extension is available on github: https://github.com/tdeuling/typo3-guide.
Credits
I want to thank my supporters via patreon.com, who make this blog post possible:
Boris Hinzer from web-vision as a silver sponsor
If you appreciate my blog and want to support me, you can say “Thank You!”. Find out the possiblities here:
I found the blog post image on unsplash. It was published by Braden Collum under the Unsplash license. It was modified by myself using pablo on buffer.


4.5
3
5